Cycling occupies an unusual position in the world of knee pain. It is recommended by clinicians for arthritis, used in rehabilitation after knee surgery, and generally regarded as one of the safest ways for an aching joint to get exercise. It is also, according to survey after survey of riders, the sport where knee complaints are most common. Both of those things are true at once, and the reason is worth understanding before you change anything.
Running loads your knees hard but with variety: no two strides are identical, the surface changes, your foot lands slightly differently every time. Cycling does the opposite. Your foot is fixed to a pedal, your hips are fixed to a saddle, and the knee traces almost exactly the same arc every single revolution. At a normal cadence of eighty to ninety revolutions per minute, a one hour ride is around five thousand repetitions. If the arc is slightly wrong, you do not get one bad movement. You get five thousand.
That is why cycling knee pain responds so well to setup changes and so poorly to rest alone. Rest lets the tissue calm down. It does not change the arc.
The Cycling Knee Pain Location Chart
This is the fastest way to narrow down what is happening. Find where your pain sits, then work through the corresponding adjustment before touching anything else.
| Where it hurts | Most likely structure | Usual bike cause | First adjustment |
|---|---|---|---|
| Front, around or under the kneecap | Patellofemoral joint, quadriceps tendon | Saddle too low, too far forward, or gears too heavy | Raise saddle 3 mm, lighten the gear, raise cadence |
| Just below the kneecap | Patellar tendon | Sudden jump in intensity, hills, or standing efforts | Cut intensity, keep spinning, rebuild load gradually |
| Back of the knee | Hamstring attachments, joint capsule | Saddle too high or too far back, leg over reaching | Lower saddle 3 mm, check hips for rocking |
| Inner side of the knee | Medial structures, pes anserine area | Feet too far apart, cleats angled wrongly, knees tracking out | Narrow the stance, move cleats out slightly on the shoe |
| Outer side of the knee | Iliotibial band, lateral joint line | Saddle too high, cleats too toe in, weak hip control | Lower saddle slightly, free the cleat rotation, add hip work |
| Deep, with swelling, locking or giving way | Possible internal joint problem | Not a fit issue | Stop adjusting and get it assessed |
If you are unsure exactly where your pain sits, it is worth pinning that down before adjusting anything, and our visual guide to knee pain locations is built for that. For the two most common cycling patterns, the dedicated guides on pain behind the kneecap and IT band pain go deeper than a chart row can.
Saddle Height: The Single Biggest Lever
If you only change one thing, change this, because saddle height drives both of the most common complaints and it does so in opposite directions.
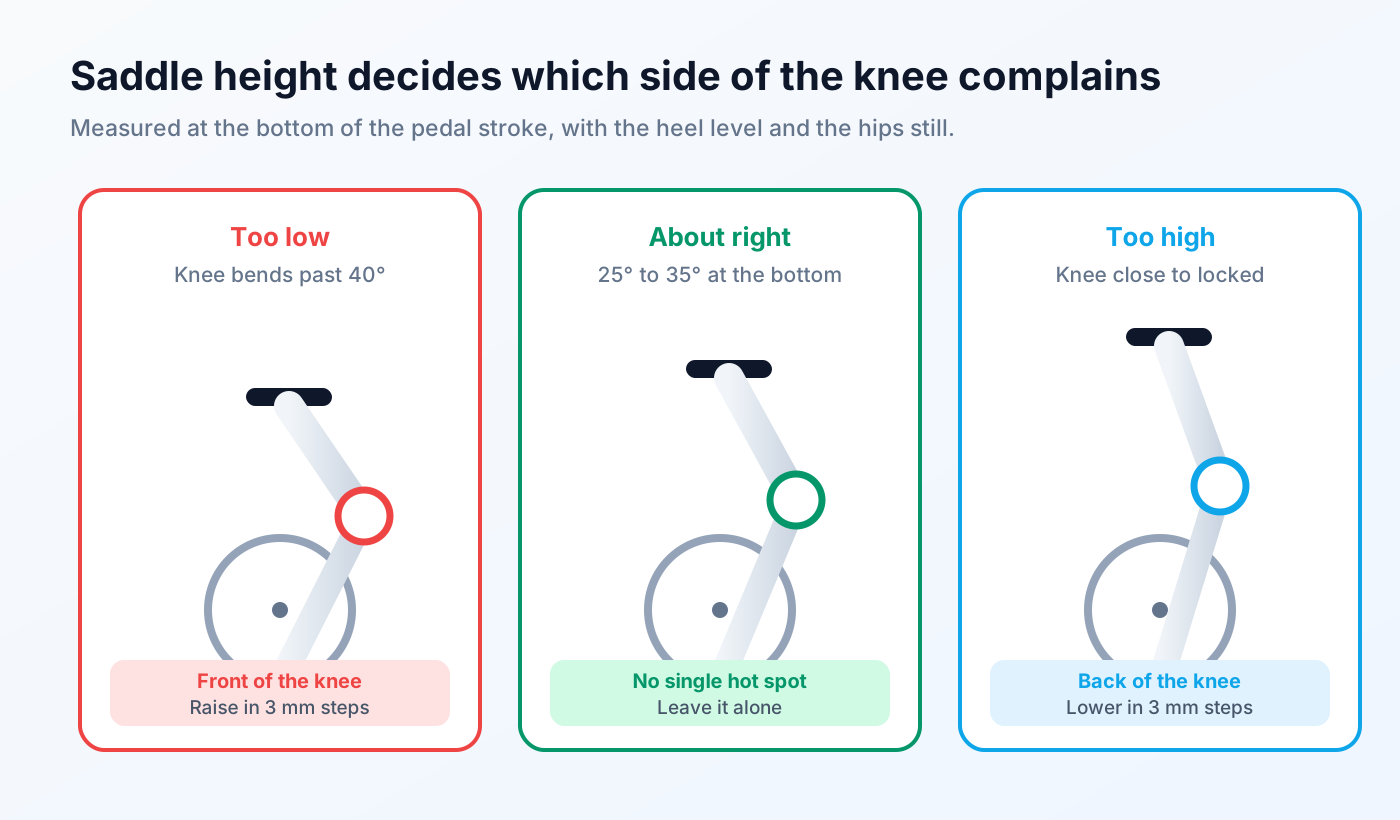
A saddle that is too low keeps the knee in a deeply bent position through the powerful part of the stroke. The deeper the bend, the harder the kneecap is pressed against the thigh bone, which is why the front of the knee complains first. It is also the more common of the two errors, partly because a low saddle feels reassuring, since you can put a foot down easily.
A saddle that is too high forces the leg to reach at the bottom of the stroke, straightening the knee close to lock out and pulling on the structures behind it. The tell is hip rocking: if your hips sway side to side as you pedal, especially when you look down or watch a video from behind, you are reaching for the pedals.
The target is a knee angle of roughly 25 to 35 degrees from straight at the bottom of the pedal stroke. For a home check, sit on the bike with a wall or a helper for balance, put your heel on the pedal at its lowest point, and your leg should be nearly straight with your hips level. Returning the foot to its normal position on the pedal then leaves the small bend you want. Whatever you do, change it in three millimetre steps and mark the original position with tape first. Anything larger and you simply trade one problem for the other.
Saddle Position, Cleats and Stance Width
Once the height is close, the remaining adjustments handle the side to side complaints and the stubborn cases.
Fore and aft position changes how far in front of the pedal your knee sits. Sliding the saddle back a few millimetres reduces load on the front of the knee, which makes it the natural partner to raising the height when the kneecap is the problem. Sliding it forward brings the knee over the pedal and can ease back of knee strain. Move it in five millimetre steps, and remember that changing fore and aft slightly changes your effective saddle height too.
Cleat position is the most under appreciated variable on the bike. Cleats mounted too far forward, so the ball of the foot sits well ahead of the pedal axle, increase leverage through the calf and load through the front of the knee. Moving them rearward, toward the middle of the foot, often settles anterior knee pain that saddle changes alone did not fix. Rotation matters just as much: your knee needs a few degrees of float to find its own path, and a cleat that locks your heel in an unnatural angle creates inner or outer knee strain within a single ride.
Stance width, the distance between your feet, should roughly match how your legs naturally hang. Feet held too far apart tend to produce inner knee complaints; too close together tends to produce outer knee complaints. Pedal spacers or a different cleat position on the shoe can adjust this. If your inner knee is the problem, our guide on side of knee pain explains what those medial structures are actually doing.
Gearing and Cadence Do Half the Work
You can have a perfectly fitted bike and still hurt your knees by riding it badly. Grinding a heavy gear at a low cadence produces high force through the kneecap on every stroke, which is precisely the load pattern the front of the knee dislikes. Riders coming from the gym often default to this, because pushing hard feels like effort well spent.
A cadence of roughly 80 to 95 revolutions per minute spreads the same work over more, lighter repetitions. If you are not sure what you currently do, count your right leg for fifteen seconds and multiply by four. Riders who habitually sit at 60 rpm and switch to 85 rpm often report that their knees settle within a couple of weeks without changing anything on the bike at all. Hills deserve special attention, since that is where cadence collapses. Fitting easier gears is a legitimate fix, not an admission of weakness.
After the ride
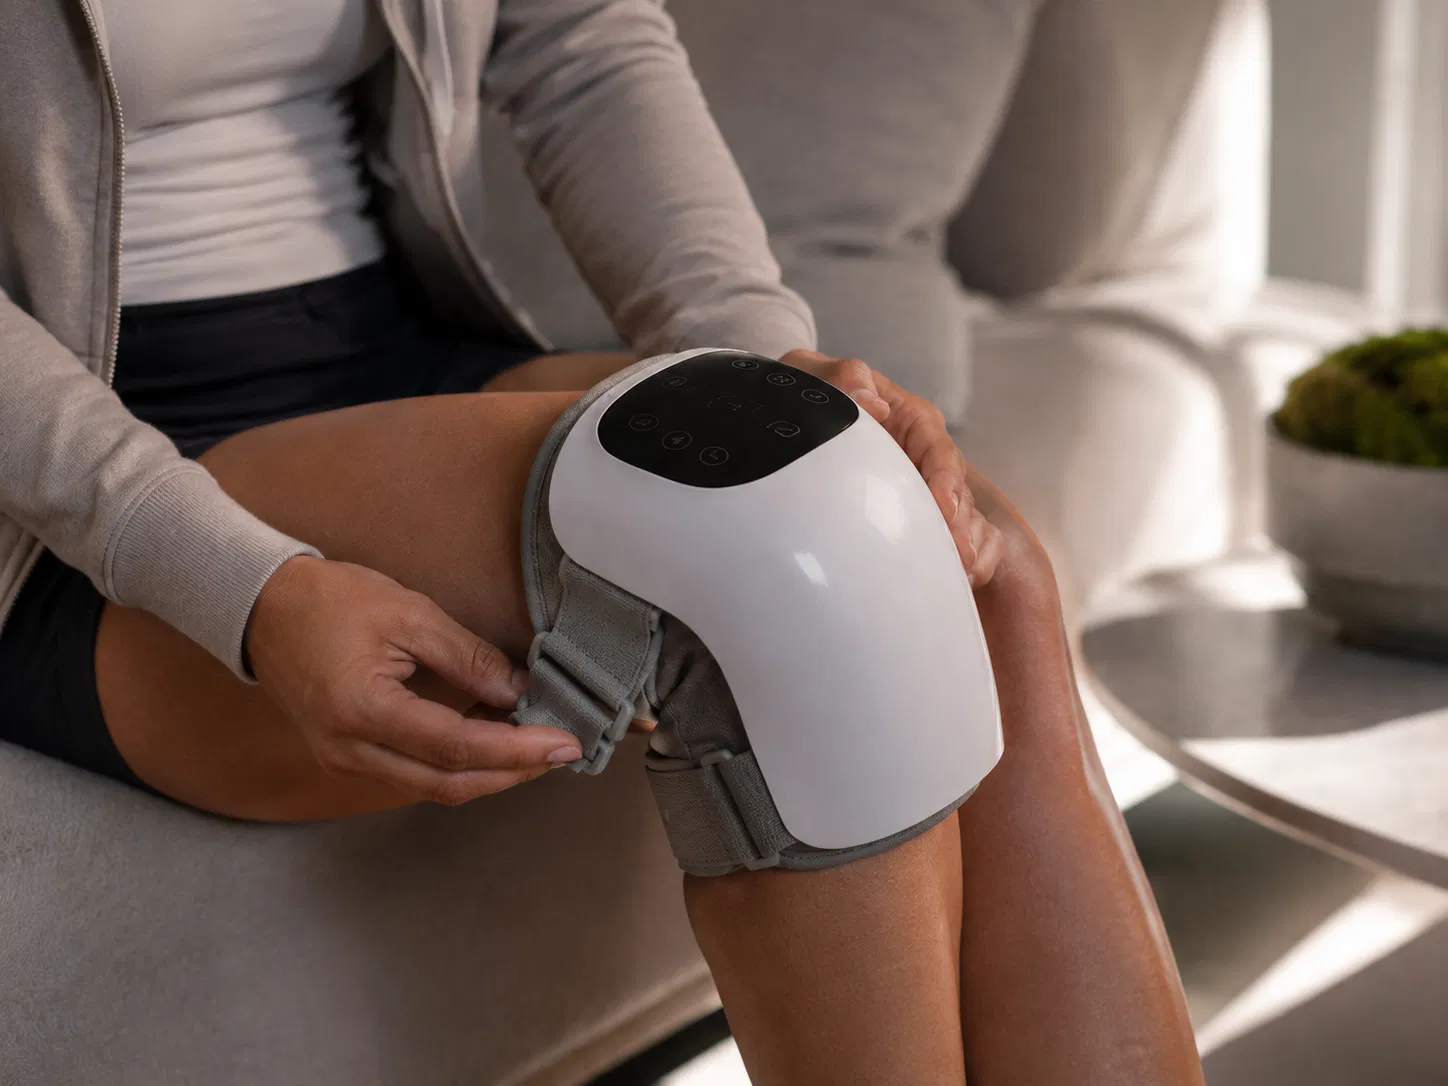
Setup fixes the cause, but the evening after a long ride is still where stiffness shows up, particularly in colder months. Many riders find warmth around the joint makes the transition from saddle to sofa less uncomfortable and keeps the next morning easier. Our FlexiKnee heated knee massager runs fifteen minute sessions combining warmth, red light and gentle vibration for exactly that window. It is a recovery tool rather than a fix: if your saddle is two centimetres too low, no amount of heat will out argue five thousand bad pedal strokes.
Change One Thing, Ride Twice, Then Judge
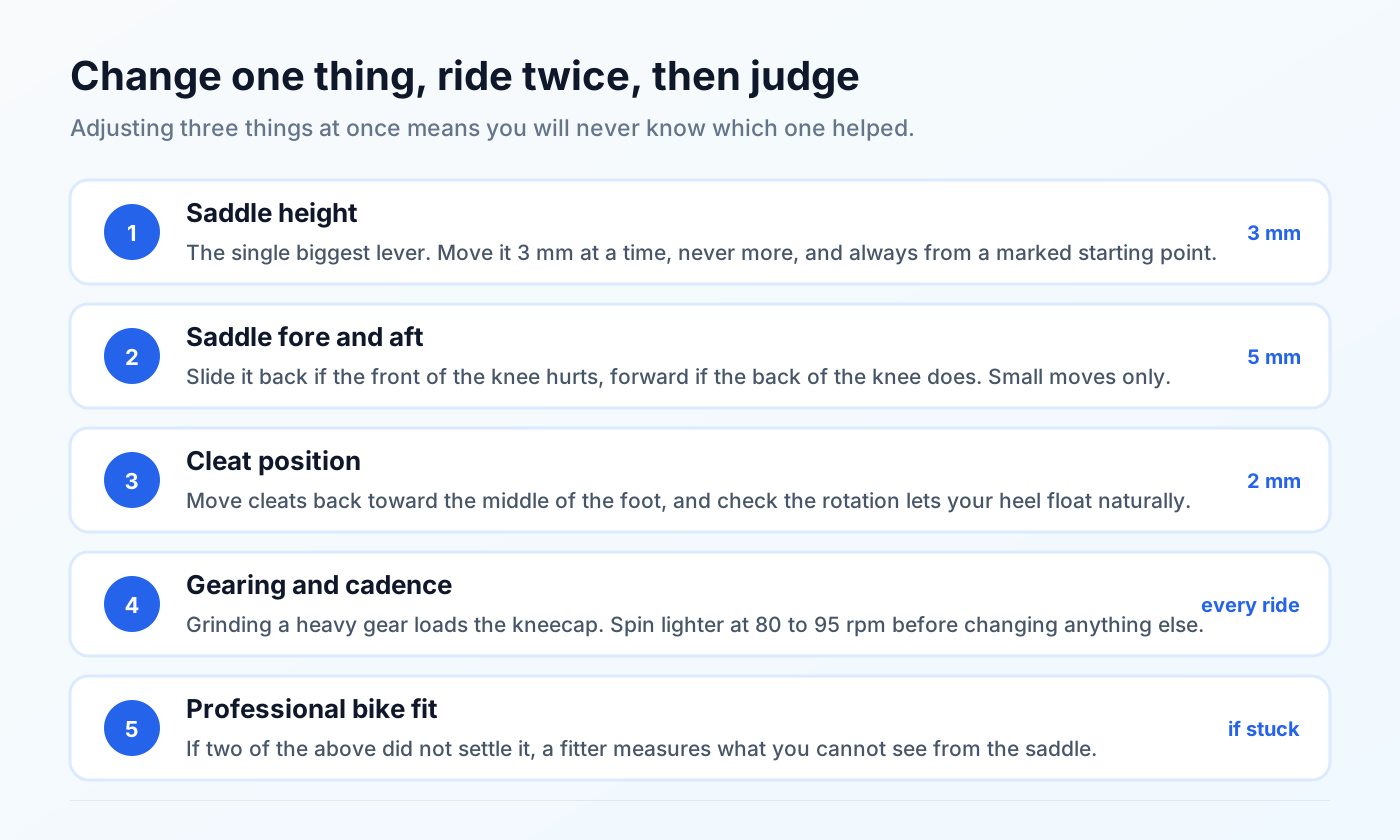
The discipline here matters more than the specific numbers. Mark your starting position with a piece of tape or a marker so you can always return to it. Make one adjustment. Ride at least twice, on rides similar to your usual ones, before deciding whether it helped. Write down what you changed and what happened, because in three weeks you will not remember.
Riders who change saddle height, cleat position and gearing in the same week almost always end up more confused than when they started, and frequently worse off, because two changes can pull in opposite directions. Slow is faster here.
Getting Back on the Bike After a Flare
When a knee is irritated, complete rest is rarely the best plan. The joint responds well to gentle movement, and cycling at low resistance is one of the better ways to provide it. Drop the duration to about half of what you were doing, keep the gears light and the cadence high, stay on flat ground, and avoid standing efforts entirely for a couple of weeks.
Rebuild by roughly ten percent per week rather than jumping straight back to your previous distance, which is the same principle that governs recovery in every other activity, as covered in our guide to knee pain after exercise. Pay attention to the pattern rather than to individual bad days: discomfort that fades within a day and does not worsen week on week is usually tolerable, while pain that arrives earlier in each successive ride is telling you the underlying cause has not been addressed.
Two supporting factors are worth attention while you rebuild. Tight calves limit ankle motion and change how the foot behaves on the pedal, and calf tightness is common in cyclists who never stretch. Weak hip abductors let the knee drift inward through the stroke regardless of how well the bike is set up, so the exercises in our knee strengthening guide pay for themselves on the bike faster than almost anywhere else. On stiff evenings, our heat versus ice guide covers which is appropriate when.
Indoor Trainers Change the Rules
Anyone whose knee pain appeared during a winter of indoor training has probably blamed the wrong thing. Riding on a turbo trainer or a smart bike is meaningfully harder on the knees than riding outdoors, for reasons that have nothing to do with the bike being set up differently.
Outdoors you coast. You freewheel down hills, soft pedal at junctions, stand out of the saddle, shift your weight on corners, and change position constantly without noticing. Indoors none of that happens. Most trainers keep resistance on through the entire revolution, structured sessions rarely include genuine freewheeling, and your hips stay locked in one spot for the whole hour. An hour indoors can easily contain more continuous, identical loaded repetitions than two hours on the road.
The practical adjustments are simple. Deliberately soft pedal or stop for ten to fifteen seconds every few minutes, get out of the saddle occasionally even when the session does not call for it, and set the fan up properly, because a cold, stiff joint tolerates repetition far worse than a warm one. If you are following a structured plan, treat the first two weeks indoors as a build rather than a continuation of your outdoor volume. Foot support matters more indoors too, since your foot is doing the same thing for longer, and a supportive insole inside a cycling shoe can steady how the foot loads the pedal, which is the same principle covered in our insole guide.
When It Is Not the Bike
Bike fit explains the majority of cycling knee pain, but not all of it. Some presentations belong with a clinician regardless of how carefully you measure your saddle.
Get the knee assessed if it swells after riding, if it locks or catches, if it gives way, if pain is sharp rather than achy, or if it hurts just as much walking around the house as it does on the bike. Pain that started immediately after a specific incident, such as a crash or a foot slipping off a pedal, also deserves proper examination rather than adjustment. And if you have existing arthritis, cycling is likely to remain one of your best options, but the fit conversation is worth having with someone who can watch you ride, as our knee arthritis guide explains.
Choosing a stationary-bike format is a separate decision from adjusting an existing bicycle. Compare seat access, back support, and pedal reach in the recumbent versus upright exercise bike guide.
Explore the specific cycling question behind your next decision
For the hours after riding, use the post-ride recovery guide. For studio sessions, see indoor cycling class load. Plan complementary exercise with the off-bike strength routine.
Equipment decisions have separate trade-offs. Compare shorter crank lengths, cleat float and compatibility, sleeves versus warmers, and electric assistance and easy mounting without assuming any one purchase diagnoses or treats knee pain.
Diagnosed conditions need a different activity discussion. Read cycling with knee osteoarthritis for load planning, or cycling after knee replacement for questions to discuss with your surgical and rehabilitation team.
The Bottom Line
Cycling deserves its reputation as a knee friendly sport, and the answer to knee pain from riding is almost never to stop riding. It is to stop repeating the same slightly wrong movement five thousand times an hour.
Use the location chart to work out what your pain is pointing at. Start with saddle height, because it drives both of the most common patterns and it is the fastest thing to test. Move it three millimetres at a time from a marked position, then look at fore and aft, then at cleats, and keep your cadence up around 80 to 95 while you do it. Change one variable, ride twice, then decide. If two rounds of that have not settled things, a professional bike fitter will see in twenty minutes what you cannot see from the saddle, and it is money well spent for anyone riding regularly. Save the clinician for the symptoms that are not about the bike at all: swelling, locking, giving way, or pain that follows you off the bike and into the rest of your day.
Frequently Asked Questions
Is cycling good for knee pain?
For most people, yes. Cycling loads the knee without impact, keeps the joint moving through a controlled range, and builds the quadriceps and hamstrings that support it, which is why it is so often recommended for osteoarthritis and for returning to activity after injury. The caveat is setup. A poorly fitted bike takes a joint friendly activity and repeats a bad angle thousands of times, so if cycling hurts your knees, the answer is usually to adjust the bike rather than to stop riding.
Why does the front of my knee hurt when cycling?
Front of knee pain is the most common cycling complaint and usually reflects pressure between the kneecap and the thigh bone. The three usual culprits are a saddle that is too low, a saddle that is too far forward, and pushing heavy gears at a low cadence. All three increase the load on the front of the joint at the top of the pedal stroke. Raise the saddle in three millimetre steps, consider sliding it back slightly, and spin a lighter gear before changing anything else.
Why does the back of my knee hurt after cycling?
Pain behind the knee usually means the leg is reaching. A saddle that is too high, or too far back, forces the knee close to full extension at the bottom of the stroke and puts the hamstring attachments and the back of the joint capsule under repeated strain. Lower the saddle in three millimetre increments and check that your hips are not rocking side to side as you pedal, since rocking is a reliable sign the saddle is too high.
What saddle height should I use to avoid knee pain?
A practical target is a knee angle of roughly 25 to 35 degrees from straight at the bottom of the pedal stroke, with the leg never locking out. A quick home check is the heel method: sit on the bike, place your heel on the pedal at the lowest point, and your leg should be almost straight with the hips level. When you return your foot to its normal position, that leaves a small bend. Adjust in three millimetre steps and ride twice before judging.
Can cleat position cause knee pain?
Yes, and it is the most overlooked cause. Cleats that sit too far forward increase load through the front of the knee, cleats that force your feet too far apart or too close together create inner or outer knee strain, and cleats that lock your foot at the wrong rotation prevent the natural float your knee needs. Move cleats slightly rearward toward the middle of the foot, match the stance width to how your legs naturally hang, and make sure your pedals allow a few degrees of rotation.
How long should I stop cycling if my knee hurts?
Complete rest is rarely the best answer. For mild discomfort, reduce duration and intensity rather than stopping, keep the cadence high and the gears light, and fix the setup issue before adding distance back. For sharp pain, swelling, or pain that persists off the bike, take a genuine break and get it assessed. Returning gradually, at around half your usual duration and building by roughly ten percent a week, is what prevents the same problem recurring.
Should I use a knee brace or sleeve for cycling?
A light compression sleeve is comfortable for some riders and can add warmth on cold days, which many people find helps stiff knees. It does not correct a fit problem. If your knee hurts because your saddle is two centimetres too low, a sleeve simply lets you feel the same problem slightly less clearly for a while, so treat support as a comfort measure and the bike setup as the actual fix.
When should I see a professional bike fitter?
If you have worked through saddle height, saddle position and cleat setup one change at a time and the pain persists, a fitter is worth the money. They can see things you cannot from the saddle, including hip rocking, leg length differences, foot position under load, and how your position changes as you fatigue. It is also the sensible first step rather than the last if you are riding long distances regularly.